Changing a pool light is a small repair with serious electrical risks. Water, metal housings, and hidden wiring create little room for error. This guide explains how to change a swimming pool light bulb safely, using practical checks before touching the fixture.
The U.S. Consumer Product Safety Commission reported an average of 358 fatal child drownings annually from 2019 through 2021. That figure concerns water access, not light repairs, but it shows why pool safety deserves careful attention. The National Electrical Code, especially Article 680, requires protection for underwater pool lighting. Ground-fault circuit-interrupter protection is central to that standard. It can help interrupt dangerous current quickly.
Electrical-safety educator Thomas A. Domitrovich offers a useful warning: “Electricity and water are a dangerous combination.” The sentence sounds obvious. Many accidents begin when someone assumes the switch is enough. A breaker must be turned off, and the circuit should be tested with a properly rated voltage tester. The pool light niche, gasket, cord, and lens also need inspection for corrosion, cracks, or trapped water.
A licensed electrician should handle uncertain wiring, failed bonding, or repeated GFCI trips. Manufacturer instructions also matter because bulb wattage, lens screws, and gasket designs differ. Even experienced homeowners can rush this job. That is the uncomfortable part. A dry deck does not prove a safe circuit. This seven-tip guide focuses on preparation, verification, careful handling, and honest limits, so a brighter pool does not create a darker problem.
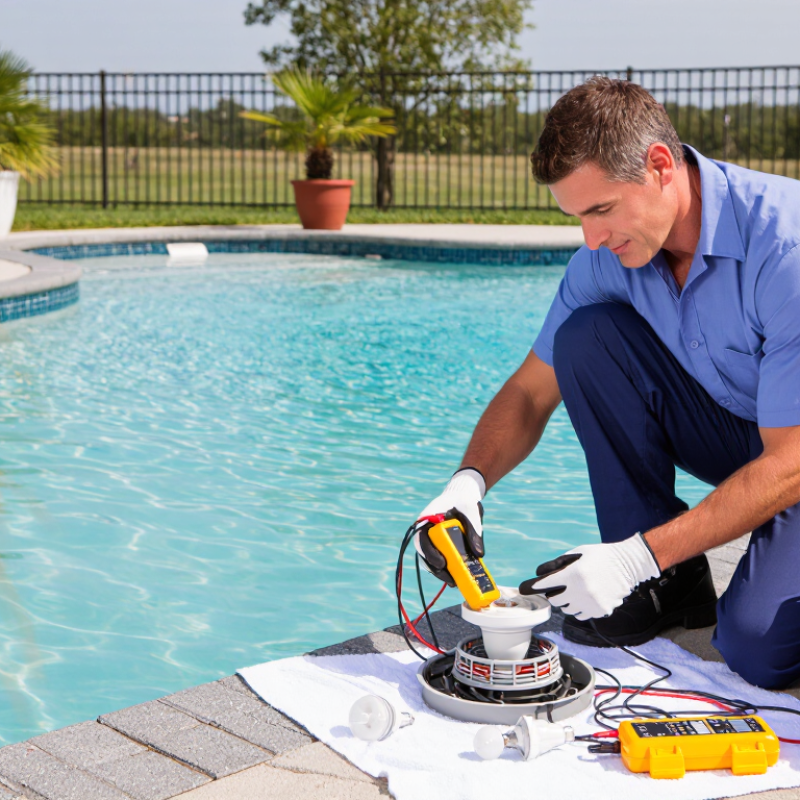
Before changing a swimming pool light bulb, identify the fixture type. Check whether it is wet-niche, dry-niche, or nicheless. The housing, lens, and label provide useful clues. Do not assume every underwater light uses a replaceable bulb. Some sealed units require complete replacement. Read the voltage marking carefully.
Turn off the circuit at the breaker, then confirm that the light is dead with an approved tester. Water and electricity leave little room for shortcuts. Inspect the cord, lens gasket, screws, and bonding connection. A cracked lens or flattened gasket can allow water inside. Replace damaged parts with components approved for that fixture.
Look for a certification mark showing compliance with UL 676, which covers electric underwater luminaires. The product label should match the installation instructions and supply voltage. NEC 680.23 also addresses underwater luminaire placement, grounding, bonding, GFCI protection, and junction-box requirements. These details are not decorative paperwork. They help control shock hazards around the pool.
Follow the manufacturer’s service procedure, including the correct bulb wattage and gasket position. Keep the fixture secured before restoring power. If the label is missing, the cord looks brittle, or the wiring differs from the instructions, stop there. A licensed electrician should inspect it. I have learned that a familiar-looking fixture can hide an outdated installation. Even a careful repair can fail when the original enclosure was already compromised.
Identify the fixture first, confirm its listing and installation type, and verify the applicable requirements of UL 676 and NEC 680.23 before opening or removing any underwater luminaire.
Selected dimensional checks from NEC Article 680, shown in inches. These values help confirm the surrounding installation; they do not replace the fixture instructions or local electrical inspection requirements.
NEC requirements can vary by adopted edition and local amendments. The authority having jurisdiction and the fixture manufacturer’s instructions control the final installation.
Changing a swimming pool light bulb demands more than switching off the wall control. The switch may interrupt only one conductor, while power remains inside the junction box. Turn off the correct circuit breaker and isolate it against accidental reactivation. Keep the area dry. Do not guess.
Use a properly rated, tested voltage meter before touching any wiring. Check the meter on a known live source first, then test the pool-light circuit.
Test line-to-neutral, line-to-ground, and neutral-to-ground where applicable. A non-contact tester can provide an extra warning, but it should not confirm zero voltage by itself.
Test the meter again on the known live source afterward. This confirms that the instrument worked during the inspection.
Pool lighting can involve transformers, junction boxes, bonding conductors, and local code requirements. Read the fixture instructions and inspect the meter leads for cuts or loose probes. Never stand in water while testing, even if the voltage seems low.
I have seen people trust a dark switch and skip the meter check; that shortcut is easy to regret.
If the circuit layout is unclear, stop and call a licensed electrician familiar with pool systems. A replacement bulb is not worth uncertain electrical work.
Use GFCI protection and maintain NEC 680.23 bonding continuity. The U.S. Consumer Product Safety Commission estimates roughly 400 electrocutions occur annually in the United States. Water leaves little room for error.
Tip: Turn off the circuit breaker, not only the wall switch. Tip: Press the GFCI TEST button, then confirm power stops. Tip: Verify zero voltage with a properly rated tester. A switch can fail. Never work from inside the pool.
Tip: Remove the fixture carefully and keep every screw organized. Tip: Inspect the gasket for cracks, flattening, or sand. A small leak matters. OSHA training materials cite about 30,000 nonfatal electrical shock incidents each year.
GFCI protection reduces shock risk, but it cannot correct damaged insulation or poor grounding. If the GFCI will not trip, stop immediately.
Tip: Preserve NEC 680.23 bonding continuity. Inspect the bonding screw, niche, and grounding conductor for corrosion. Tip: Never cut, cap, or improvise the bonding connection. It must remain continuous to the pool’s equipotential bonding system.
Tip: Replace a damaged gasket and tighten lens screws evenly. Tip: Call a qualified electrician when continuity testing is unclear. A bulb may illuminate after a poor repair. That does not prove safety.
I would rather delay the swim than trust a bright lamp and a doubtful bond.
Changing an underwater pool light demands more than a new bulb. Turn off the circuit breaker, then verify that power is absent with a properly rated tester. Never trust a wall switch alone. The National Electrical Code, NFPA 70 Article 680, requires special protection for pool lighting circuits, including ground-fault protection. That protection reduces risk, but it does not replace careful work.
Remove the lens screw and support the lens as it comes free. Keep the screw and washer together. Gently lift the fixture onto the pool deck without pulling its cable. Remove the old bulb only after it has cooled. Check the fixture label and install a bulb with the exact voltage, wattage, base, and underwater rating. A brighter bulb is not automatically safer. It can create heat and damage the fixture.
Inspect the gasket closely. Look for flattening, cracks, grit, or hardened rubber. Replace damaged sealing parts, and clean the groove with a lint-free cloth. I once underestimated a tiny grain of sand; it can prevent a watertight seal. Do not overtighten the lens screw. Refit the gasket evenly, position the lens correctly, and tighten it gradually. Restore power only after the fixture is fully assembled and dry outside the pool. The U.S. Consumer Product Safety Commission estimated 6,300 emergency-treated, nonfatal drowning injuries among children under 15 each year from 2019 through 2021. Electrical maintenance deserves that same seriousness. When the fixture, wiring, or seal looks questionable, use a qualified pool electrician.
| Tip | Recommended Action | Safety Check | Important Detail |
|---|---|---|---|
| 1. Turn off all power | Switch off the pool-light circuit breaker and any related disconnect. Prevent anyone from restoring power while work is in progress. | Confirm that the light does not turn on. Use an appropriately rated voltage tester if you are qualified to do so. | Pool lighting combines electricity and water. A qualified electrician should handle uncertain wiring or line-voltage systems. |
| 2. Verify the replacement bulb | Read the fixture label or installation manual before purchasing a replacement. Match the voltage, wattage, bulb type, base, and temperature rating. | Do not install a bulb with a higher wattage or different voltage than specified for the fixture. | Common pool lights may use low-voltage or line-voltage designs, so the correct rating must be confirmed rather than assumed. |
| 3. Remove the light fixture safely | Remove the retaining screw or clip, then carefully lift the fixture onto the pool deck using the available cord length. | Keep the fixture supported and avoid pulling, twisting, or sharply bending the underwater cable. | Many wet-niche fixtures are designed to be serviced from the pool deck without draining the pool. |
| 4. Remove the lens and old bulb | Loosen the lens fasteners evenly. Remove the lens, gasket, and old bulb according to the fixture instructions. | Wear dry, cut-resistant gloves if the lens is damaged or the bulb has broken. Do not force corroded fasteners. | Glass bulbs can remain hot after operation; allow the fixture to cool completely before handling. |
| 5. Install the correct-rated bulb | Insert the replacement bulb without touching the glass envelope with bare fingers when the bulb instructions prohibit it. Secure it firmly but do not overtighten. | Check that the bulb is seated correctly and that the socket is clean, dry, and free of corrosion. | A bulb that is loose, incorrectly seated, or incorrectly rated may overheat, fail prematurely, or damage the fixture. |
| 6. Inspect and replace the gasket | Inspect the gasket for cracks, flattening, cuts, hardening, or deformation. Replace it if it is not in excellent condition, then position it evenly. | Clean the sealing surfaces and make sure no hair, grit, or debris is trapped between the lens and gasket. | Use only the gasket specified for the fixture. Do not rely on general-purpose sealants to compensate for a damaged or incorrect gasket. |
| 7. Reassemble and test carefully | Reinstall the lens and tighten fasteners evenly in a crisscross pattern when applicable. Return the fixture to its niche and secure it before restoring power. | Restore power only after the fixture is fully assembled. Check for flickering, tripped protection, water inside the lens, or unusual heat. | If the light fails, trips the protective device, or shows moisture inside the lens, switch off power and obtain professional service. |
Changing a swimming pool light bulb begins with isolation, not the screwdriver.
Turn off the circuit breaker and verify the light stays off. A non-contact tester can help, but it should not replace proper electrical testing. If you are unsure, contact a licensed electrician familiar with pool equipment and local codes.
Remove the housing carefully and inspect the gasket, screws, cable entry, and lens for cracks. Keep the parts on a clean towel, away from sand and wet concrete. Replace damaged sealing parts rather than reusing them. Fit the new bulb without touching its glass surface, then seat the gasket evenly. A twisted gasket can admit water slowly, even when the housing looks closed.
Test for leaks before restoring power. Place the sealed housing in the correct position according to its instructions, or use the approved inspection method for that fixture. Watch for bubbles, water movement, or moisture inside the lens. Leave it unpowered while checking. I once found a tiny gasket fold that was almost invisible; tightening the screws harder would not have fixed it. Do not rush. The housing must remain fully sealed and secure before power returns. After confirming the seal, restore power from a dry location and test the light briefly. Stop immediately if the breaker trips, the light flickers, or moisture appears. Recheck the seal and seek professional help when the cause is unclear.
The switch may interrupt only one conductor. Power can remain inside the junction box. Turn off the correct circuit breaker. Isolate it against accidental reactivation.
Test a known live source with a properly rated meter. Then test the pool-light circuit. Check line-to-neutral, line-to-ground, and neutral-to-ground when applicable. Test the meter again afterward. Do not guess.
No. It provides an extra warning, not final proof. Use a tested meter for confirmation. This distinction matters.
Check the gasket, screws, cable entry, and lens. Look for cracks, cuts, or loose parts. Keep components on a clean towel. Avoid sand and wet concrete.
Avoid touching the bulb’s glass surface. Seat the gasket evenly around the housing. Replace damaged sealing parts. A twisted gasket may allow slow water entry.
Keep the circuit unpowered during inspection. Place the sealed housing correctly. Watch for bubbles, water movement, or lens moisture. A tiny gasket fold can be difficult to see.
Restore power only after confirming the housing is sealed and secure. Use a dry location near the controls. Test the light briefly. Do not rush.
Switch the power off immediately. Stop using the light. Recheck the seal only if conditions are safe. Contact a licensed electrician when the cause remains unclear. The shortcut may not be worth it.
Learning how to change a swimming pool light bulb safely begins with identifying the light fixture and confirming that it meets applicable safety requirements, including UL 676 and NEC 680.23 guidelines. Before touching the light, switch off the circuit and use a properly tested meter to verify zero voltage. The circuit should have GFCI protection, and the bonding connection must remain continuous to help reduce electrical risks in the pool environment.
Next, carefully remove the lens and take out the old bulb. Install only a replacement bulb with the correct voltage, wattage, and fixture rating. Inspect the gasket for wear, damage, or deformation, and replace it if necessary. Reassemble the housing evenly, ensuring the lens and gasket create a secure seal. Check for leaks before restoring power, and do not turn the circuit back on until the light housing is fully sealed and correctly positioned. When in doubt, consult a qualified electrician.
